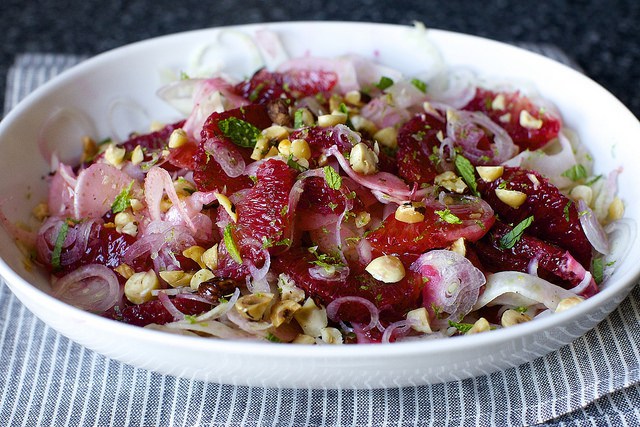
Citrus comes in many shades with flavors ranging from tart to sweet. A bit like candy but not. Part of my winter survival will be finding tasty ways to get my daily dose of vitamin C. Here is a lovely winter citrus salad paired with toasted hazelnuts and fennel from Smitten Kitchen (no surprise). My orange cutting skills could use some improvement but other than that, this dish is pure sunshine. Don’t be afraid to mix up the citrus. I used two blood oranges, a sumo orange, and a grapefruit. Fennel and blood orange salad recipe and images from Smitten Kitchen. So good, so clean, so refreshing!
1/4 cup hazelnuts or walnuts 1 medium-large fennel bulb, leaves and stems trimmed off Salt and freshly ground black pepper Juice of 1 lemon 2 large blood oranges 1 small shallot, peeled and cut into paper-thin slices 10 mint leaves 2 tablespoons extra-virgin olive oil 1 teaspoon lime zest
Place nuts in dry skillet and cook over medium heat, stirring, to toast. Let cool. If using hazelnuts, roll them around in a dishcloth (or, if cool enough, in your hands), discarding any loose skins. Coarsely chop nuts; set aside.
Slice about 1/2 inch from bottom of fennel and discard. Slice fennel very thinly on a mandolin, benriner or with a knife, starting with flat bottom side. Toss in serving bowl with salt, pepper and lemon juice.
Trim all peel and pith from oranges. Holding peeled fruit over bowl containing fennel, use sharp knife to cut sections from membrane and let them drop into bowl. Squeeze remaining membrane over bowl to sprinkle salad with remaining juice, and discard membrane.Add shallots, mint leaves, olive oil and reserved nuts and toss gently. Sprinkle with lime zest.
Do ahead: While the mint leaves will look and taste best on the first day, I really enjoyed the leftovers from this salad for lunch the next day.
Veggie delight strikes again! Holding strong to cooking flavorful vegetarian meals. A three-bean chili from Smitten Kitchen is an uncomplicated mid-week winter comfort dish. SK offers lovely notes to make this dish easy and quick to prepare. I went with the canned beans to shorten the time and opted for the stove top method for cooking. Have fun with the toppings and break out the hot the sauce. Thank you Smitten Kitchen for another winner!
Yield: About 9 cups chili; 8 smaller servings or 4 to 6 large ones
1 tablespoon olive oil 1 medium onion, chopped small 1 to 2 peppers of your choice (see Notes, below), finely chopped 3 cloves garlic, minced 2 tablespoons chili powder 2 teaspoons ground cumin 1 teaspoon dried oregano 1 1/2 teaspoons table salt or 2 1/2 teaspoons kosher or coarse salt 1 12-ounce bottle beer 1 28-ounce can crushed tomatoes, fire-roasted if you can find them 1 1/2 cups mixed dried beans (see Note) 3 1/2 to 4 cups water
To serve: Lime wedges, sour cream, diced white onion, cilantro, corn or flour tortillas or tortilla chips or rice
Heat oil in the bottom of a medium-sized heavy pot or Dutch oven (if finishing it on the stove), in the pot of your pressure-cooker (if using one) or in a large skillet (if finishing in a slow-cooker). Once warm, add onion and cook for 5 minutes, until translucent. Add any fresh peppers and cook for 3 more minutes. Add garlic, chili powder, cumin, oregano and salt and cook for 2 minutes, until browned and deeply fragrant. Add beer and scrape up any bits stuck to the pot. Boil until reduced by half, or, if you’re nervous about alcohol content, until it has all but disappeared.
If finishing on the stove: Add tomatoes, dried beans, any dried or rehydrated-and-pureed chiles and the smaller amount of water. Bring mixture to a full boil and boil for one minute, then reduce heat to a very low, gentle simmer, place a lid on your pot, and cook for 2 1/2 to 3 hours, until the beans are tender, stirring occasionally. Add the last 1/2 cup water if mixture seems to be getting dry, though I didn’t need it in most of my tested batches. If a slightly more sloshy chili wouldn’t bother you, you can add it from the get-go.
If finishing in a slow-cooker: Scrape onion, spice and beer mixture into a slow-cooker and add tomatoes, dried beans, any dried or rehydrated-and-pureed chiles and the smaller amount of water. Cook on HIGH for 6 to 7 hours, until beans are tender. You can add the last 1/2 cup water if needed, but probably will not find it necessary.
If finishing in a pressure-cooker: Follow the directions from your pressure cooker manufacturer. I failed to get this fully tested in my new one (boo) but estimate that it will take 20 to 22 minutes on high.
Serve as-is or with fixings of your choice.
Notes:
Peppers: The most important decision you make about your chili is, unsurprisingly, in the chiles themselves. If you’re cooking for people who don’t like spicy food, I recommend just using 1 bell pepper or 1 fresh poblano, which is very mild. 2 fresh jalapenos will give you slightly more heat. 2 small dried chiles, depending on which you use, will give you a bit more of a kick, as will 1 to 2 chipotle en adobo peppers from a can. If you need help choosing a dried chile, Serious Eats has a great guide to the properties of each here. To best incorporate the flavor of dried chiles into your chili, cover them with a bit of boiling water until they’re soft, then puree them. If this sounds like too much work, you can cook them with the dried beans for decent heat flavor infusion.
Chile powder: If you’d like the clear flavor of your dried chiles to come through, you can skip the chile powder in part or entirely.
Tomatoes: This makes a fairly tomato-y chili. If that’s not your thing, halve the suggested tomatoes, using only a 15-ounce can instead.
Beer: Use whatever type you’d like here. I used Dos Equis; I think a Negra Modelo would also impart a nice, deep flavor.
Beans: I use a mix of three beans here, usually 1/3 dried kidney beans, 1/3 black beans and 1/3 pinto beans, but I had a bag small pink Rosa de Castillo beans from Rancho Gordo around so I used them instead. I find that these three beans, surprisingly, take about the same time to cook, but if you’re nervous one will take longer than the others, you can soak it in water while preparing your other ingredients. Even 30 minutes should even up the cooking times.
To pre-soak your beans: This recipe doesn’t call for or require pre-soaking but pre-soaked beans will cook faster. How much faster depends on how long they are soaked for, but you can estimate that beans soaked for 6 hours or overnight will approximately halve suggested cooking times, regardless of cooking method. If pre-soaking beans, do so in the 3 1/2 to 4 cups of water listed in the recipe, and use the remaining soaking liquid as the water in the recipe.
Using canned beans instead: 1 1/2 cups dried beans will yield approximately 3 to 3 3/4 cups of cooked ones. To use canned or already-cooked beans instead, you’ll want to use 2 to 3 15-ounce cans of cooked beans and then — this is important — skip the water. Simmer all of the ingredients except the drained and rinsed beans for 20 minutes, then add the beans and simmer it 10 minutes more. If the mixture looks dry, add 1/4 cup water and simmer for another few minutes
I am a visual person, so no surprise this yummy looking bowl caught my attention with its golden soft egg and colorful thinly sliced veggies. Smitten Kitchen’s Crispy Rice and Egg Bowl with a ginger-scallion dressing is a delightful mid-week winner. It’s a belly warming dish full of flavor, made with simple ingredients, and is quick and easy.
FYI I doubled the short grain brown rice, sautéed garlic with the fried rice, and topped off the bowls with sliced avocado for an extra creamy finish. Extra hot sauce is standard in our house! Maybe roasted sweet potatoes next time around or whatever else may be in the crisper. See the recipe below or read about it for more helpful tips on SK. (image from SK)
Crispy Rice and Egg Bowl with Ginger-Scallion Vinaigrette
SERVINGS: 4
TIME: 10 MINUTES
SOURCE: SMITTEN KITCHEN
1 1/4 cups minced scallions, both green and white parts (from a 4-ounce bundle)
2 tablespoons minced or finely grated fresh ginger
Neutral oil (such as grapeseed, safflower, or sunflower)
1/4 cup sherry or rice wine vinegar
Fine sea salt
About 1 heaped cup julienned or coarsely grated carrots (from about 8 ounces fresh)
8 ounces small (Persian-style, about 2) cucumbers, thinly sliced
3 cups cooked, cooled rice (my favorite here is short-grain brown or white)
4 eggs
Soy sauce or tamari (to serve)
Toasted sesame oil (to serve)
Sriracha, gochujang or another hot sauce of your choice (to serve)
Make the vinaigrette: Mix scallions, ginger, 1/4 cup oil and sherry or rice wine vinegar in a bowl. Season with salt (I use about 1/2 teaspoon fine sea salt). Set aside.
Crisp your rice: Heat a large frying pan over medium high. Add 1 to 2 tablespoons oil; you’ll want to coat the bottom with a thin layer of oil all over. Nonstick pan (as I used) are more forgiving here, so you can use the lower amount. Heat the oil until it’s hot, another minute, then scatter half the rice over the surface; it’s okay if small clusters remain. Season lightly with salt and do not touch it. In 3 to 5 minutes, the underside will become golden brown and crisp. Use a spatula to flip it in sections then fry on the other side until it is also crisp. Divide between two bowls and repeat with remaining rice, dividing it between two remaining bowls.
Crisp your egg: If there isn’t enough oil left in the pan (you want a thin layer), add another splash and heat this on high heat. Add eggs one at a time and season lightly with salt and pepper. Cook until brown, lacy, and crisp underneath, and the whites are opaque, bubbly and dramatic and the edges are brown. You can spoon some oil from the pan over the egg whites to help them cook faster. Place one egg on each bowl of rice.
Assemble bowls: Arrange some cucumbers and carrots to each bowl. Spoon 2 tablespoons vinaigrette onto each bowls. Drizzle each egg with a half-teaspoon of tamari and toasted sesame oil, letting it roll onto the other ingredients, plus hot sauce to taste. Eat immediately. Repeat frequently.
Do ahead: The dressing will keep for 5 to 6 days in the fridge; the chopped vegetables will keep for 3 to 4.
Smitten Kitchen always makes my evenings a little easier in the kitchen. It is my go to sight for tasty easy peasy recipes. I should mention quick recipes are the ones I seek out for mid-week options (who doesn’t?). I have been making SK’s scallion meatballs with soy-ginger glaze for the past few years. They are one of my low prep dinner favorites that are healthy, tasty, and a crowd pleaser. Even picky eaters can’t resist these yummy little nuggets. They are meant to be appetizers but I serve them over a bowl of brown rice with a side of roasted broccoli or baked sweet potato. I should also mention I don’t get too caught up with a perfect shape when I am forming them. Sometimes they are more like small patties. The turkey mixture is pretty soft. Wear food grade gloves then wet your hands with water (so the turkey doesn’t stick to the gloves) to make the meatballs before placing them in the skillet. (sometimes brown each side and then let them finish off cooking in the oven on a low temp around 300.)
Meatballs and sauce can be made ahead to save time! You could do the same with rice and veggie.
A hot summer day doesn’t really have you wanting to turn on your oven. But these yummy chocolate chip cookies from Smitten Kitchen will have you running to the grocery store for the chocolate chips and turning on the oven. Perfect when you need a little something sweet to accompany that cold glass of lemonade. Here is a recipe to keep in your back pocket for those days when your sweet tooth kicks in. Of course everyone has the basic Toll House recipe but this SK recipe really seems to take them up a notch. My 11-year-old who was looking for an activity had fun making them and is a huge fan. What more can you ask for?! Happy baking! Happy Weekend!
Personally I would add a little less chocolate chips (we used Ghirardelli semi-sweet) to the recipe otherwise perfection! image and recipe from Smitten Kitchen


 A hot summer day doesn’t really have you wanting to turn on your oven. But these yummy chocolate chip cookies from Smitten Kitchen will have you running to the grocery store for the chocolate chips and turning on the oven. Perfect when you need a little something sweet to accompany that cold glass of lemonade. Here is a recipe to keep in your back pocket for those days when your sweet tooth kicks in. Of course everyone has the basic Toll House recipe but this SK recipe really seems to take them up a notch. My 11-year-old who was looking for an activity had fun making them and is a huge fan. What more can you ask for?! Happy baking! Happy Weekend!